This is actually a restart of an earlier post — I was going to make a Western Red Cedar Falcate, but decided to make another Lutz Spruce guitar paired with my Panama Rosewood back and side set. The Panama Rosewood is a truly special set with great tonal quality: even the cross-grain tap made a wonderful tone. I joined the back with a thin black fiber strip running up the center.
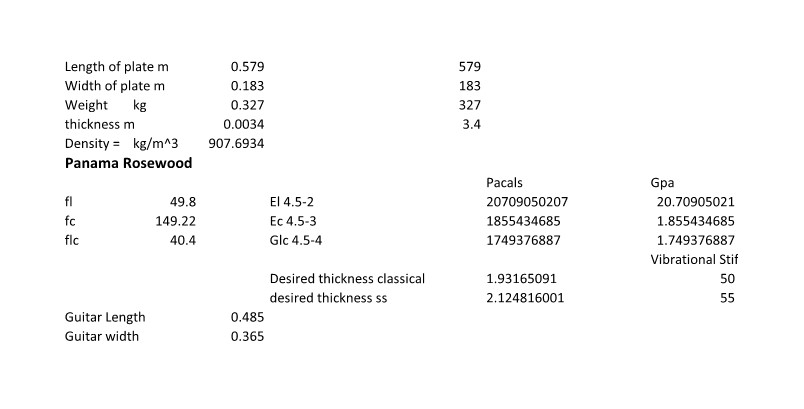
Panama Rosewood tap test & thickness calculation
.jpg)
Back plates joined — black fiber center strip
I bent the sides in a side bender and installed a heel block for the bolt-on/bolt-off neck. Then I tackled making the linings a new way. Previously I'd laminated 1.7mm strips right to the rims, but this time I made them off the guitar — I bent a strip of wood to the shape of the rims and used it along with half of an outside mold as a form to laminate the strips into a solid lining. This let me clean up the bottom of the linings with a roundover router bit, and later I realized I could also cut inlets for the mass block and side supports right into the lining. Happy with how it came together.
.jpg)
Sides bent and heel block in — bolt-on/bolt-off foundation
.jpg)
Solid laminated linings — made off the guitar for the first time, with mass block and side support inlets cut in
March 17th, 2017 — Back Bracing
I cut out a bunch of stock for back braces and used the 17.5-degree router bit to make the gabled profile on top of each brace. Then I laid out the braces, cut the rebates in the center strips, and glued them to the back in the gobar deck in a couple of sessions.
March 17th, 2017 — Neck Prep & Falcate Braces
I also did some layout and prep for the bolt-on/bolt-off neck. The only new thing was rigging up a finger-chopper-offer to make the scarf joint cut — it came out clean and square, needing almost no work with a plane. It glued up with no drama. I used a 4mm strip to set the angle for the truss rod slot, then used a 24" radius bit to radius the fretboard. I cut the fret slots and laminated a 4mm strip of mahogany to the underside of the fretboard for the Gore wedge.
Sequence MistakeFoolish me — I tapered the fretboard before routing the truss rod slot into what will be the wedge. So I had to cut it out with a scalpel and a chisel. Order of operations matters.
For the falcate braces I laminated Lutz Spruce strips bent on a hot pipe using molds made for previous guitars.
March 18th, 2017 — Top Selection & Rosette
Up until this afternoon I had settled on a Lutz top from Mario (Curly Bear) — it looked good and had a good tap. But digging through my tops I came upon a Carpathian Spruce top picked up at a Seattle Luthiers Org auction, from a classical builder. It has a great long-lasting tap tone and tested as one of the better tops I've measured: stiffer at 13.5 vs 12.7 GPa and less dense at 397 vs 422 kg/m³.
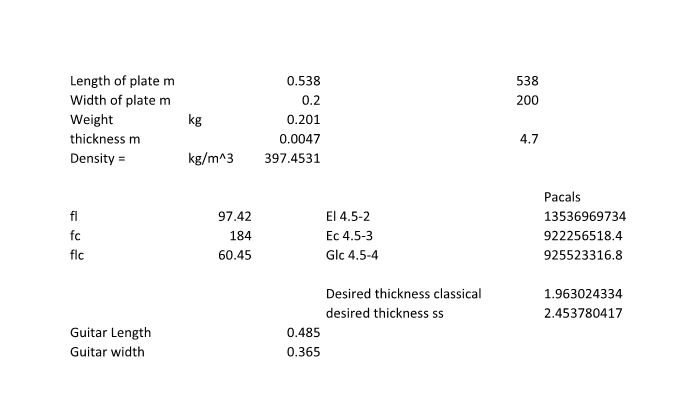
Carpathian Spruce — picked up at a Seattle Luthiers Org auction from a classical builder. Tested as one of the best tops measured: stiffer and less dense than the Lutz alternative.
I glued up the top using stretched tape and my joining jig — the tape alone was probably enough and it closed very quickly before the hot hide glue gelled. Then I added one side of the rims with AST A4 kerfed linings, which bend in four directions making it easy to follow the 10' back radius. I cut the side support strips short and capped them with bits of kerfed lining to maintain a consistent gluing surface width around the rims.
The Rosette Trick — Figured Wood Ring with Bought PurflingsI buy Russian rosettes with various purfling styles and install the whole thing normally. Then I route out the center tiles — once you get close to the purflings the end-grain squares just fly out, leaving a clean purfling channel. I then cut a custom figured wood ring to drop into that channel. This gives the classical look of a tiled rosette with the warmth of a beautiful figured wood center, without having to make the purflings from scratch.
I joined a couple of pieces of amboyna burl, installed the Russian rosette in the normal way, then routed from the center of the tiles working outward toward each purfling until I had a clean channel. Based on the actual channel measurements I drew out the ring lines on the amboyna burl, worked toward the lines, and ran the burl ring side-down through the thickness sander until the ring dropped out.
.jpg)
Completed rosette — amboyna burl center ring with Russian purflings. Classical look, figured warmth.
March 20th, 2017 — Back Brace Carving
The rim and back are ready. The top is within 0.2mm of final thickness — I always leave a bit because there's always a scratch or dent along the way. Here are pictures from carving the back braces. My little 2mm trimming jig never ceases to amaze me with how much time it saves over getting close and measuring. When finished, all the brace ends are the same height, which means I can route all the pockets in the linings without ever adjusting the router depth.
After thicknessing the top I glued on a sound hole doubler, then routed the sound hole. I never rout all the way through — I leave the plug in well into the build. With the top sanded I covered it with 5mm mylar.
March 25th, 2017 — Top Bracing
I prepped the top and decided to take a couple of passes for epoxying the braces. I started with the falcate braces, gluing them on in a 32' radius dish in the gobar deck. The layup: top, then 4K 5.7oz CF tow, then the brace. The next day I planed the braces to target heights with a block plane and profiled them with a small block plane and chisel work. Main falcates are 10mm, secondaries 7.5mm at their tallest.
I profiled all braces and then put a 4K 5.7oz CF tow on top of every brace, doing this final glue-up in the radius dish to lock the radius into the top. While the epoxy cured I cut the neck tenon on the table saw.
For the transverse brace I put a radius on just the outside edges, leaving the center flat. I marked where the falcate and sound hole braces cross into it, cut the channels with a razor saw and chisel, then epoxied it down — being lazy I left out the CF this time. It's a big brace. Under the top I used a caul matching the radius and flat spot on the brace.
March 25th, 2017 — Closing the Box
I got the box closed. I used my handy brace-end jig to size the ends and protect the back. I prepared a batch of hot hide glue and got the back clamped before the glue gelled — just barely.
Forgot the End GraftHappily glued the back on and then realized — no end graft. I need to make a checklist for major assembly steps. Before gluing on the top I cut the rebate and installed an ebony and maple strip end graft. I used a scalpel to mark the outline, cleared the rebate with a chisel. A lot of builders cut the rebate after closing but I once cut into what was to be finished top wood — never again. I'm messy with hide glue as well. It wipes off with water.
.jpg)
Top glued on with hot hide glue — box closed
March 25th, 2017 — Bindings & Purflings
I glued maple purfling strips to ebony bindings using Titebond III (I hear it's better with heat). I leveled the sides with an inflatable spindle sander and a scraper before routing — a smooth level surface is critical for the binding machine's bearing to ride on. I taped a maple purfling strip to the back over the end graft to force the router to lift at that point, leaving a strip of end graft above the binding rebate for the purfling join.
I use a Fleishman Binding Machine with a Luthier Tool Company binding cutter head. For the back I fit and glued the binding with hot hide glue. For the top, which had three purfling strips (black, rosewood, black), I used fish glue — it's messier but gives a very long open time. I coat the purflings, force them together off the guitar, install on the ledge with tape, paint the channel with fish glue, then install the binding. The fish glue gets so tacky I can remove the tape while it's still in place, and the long open time means no rushing.
April 14th, 2017 — Neck Extension & Body Joinery
While the bindings were curing I did initial shaping of the heel on the bandsaw and belt sander. Once the heel was carved I was able to set the neck angle, route the pocket for the neck extension, and install the extension for the bolt-on/bolt-off neck.
.jpg)
Bolt-on/bolt-off neck fitted — neck angle set and confirmed
April 14th, 2017 — Headstock & Neck Carving
I laminated a Brazilian Rosewood headstock veneer with black and white fiber sheets, shaped the wedge extension to match the headstock angle, and glued on the veneer. I rough-cut the headstock shape on the bandsaw then used spokeshave, plane, and chisels to finish the shape. My Luthier Tool slotting jig handled the tuner holes and slots.
.jpg)
Headstock complete — Brazilian Rosewood veneer with black/white fiber lines
Heavy work with a spokeshave, then rasps, chisels, and sandpaper. I had been thinking that my previous classical heels were a bit clunky — with the neck extension the heel carries almost none of the structural load, so I went with a more vestigial heel. It's really only 2mm smaller than normal but it looks noticeably cleaner. Getting used to it.
April 14th, 2017 — Finish Prep & Bridge
I sanded everything to 220, filling gaps and chips in the rosewood along the way. Then for the first time I tried a water-based clear filler — Aqua Coat. After Z-Poxy it was a pleasure to work with. It mostly filled the pores. I followed with a few wash coats of shellac, then pore-filled the neck with finishing-grade thick CA before moving into the spray schedule for post-catalyzed Royal Lac.
.jpg)
Body in spray schedule — Aqua Coat + shellac sealer, ready for post-cat Royal Lac
During the previous classical guitar project I made an extra CF-reinforced walnut bridge blank. Between spray sessions I used the mini milling machine to shape it into a classical bridge, then started the ebonizing process — a vinegar and steel wool solution.
May 4th, 2017 — Finishing
I pore-filled the body with Aqua Coat, sealed with 2lb-cut shellac, and sprayed post-catalyzed Royal Lac for the finish. It took a day to figure out how to spray it cleanly — I used an HVLP gun with a 1.2mm tip. Five coats the first day (I'm sure I sanded most of them off), five clean coats the second day, then leveled the next morning and finished with three more coats. Three days later I wet sanded and buffed. I really like the look and feel of the product.
.jpg)
Post-cat Royal Lac — five coats, leveled, five more, three final coats. Wet sanded and buffed three days later.
With the finish on, I placed the bridge, cleared the bridge location with straight-edge razors followed by a light sanding, then glued it on with an LMI vacuum clamp.
May 4th, 2017 — Fretting, Nut & Setup
I used a hammer to drive the frets — except for the last two which went in with widened slots and CA glue. I roughed out a nut from bone and did the initial setup.
Here it is all strung up.
May 4th, 2017 — Back Resonance Tuning
I took a frequency response curve with Visual Analyzer. I was a bit off my targets — I had hoped for a top resonance of 190 Hz and the back four semitones above that, but ended up with top at 186 Hz (just above F#) and back at 232 Hz which is four semitones above 186. The problem: everything was uncomfortably close to actual note frequencies.
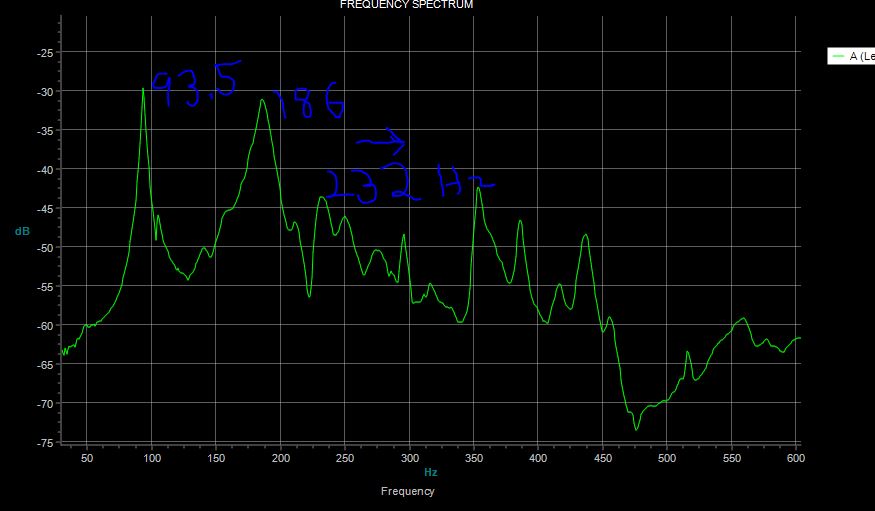
FRC just strung — top 186 Hz (near F#), back 232 Hz (four semitones above). Both too close to note frequencies.
Trevor's Back Brace Stiffening FixAs an experiment to move the back resonance higher — hoping the top would shift slightly off F# as well — Trevor suggested splitting a section of brace in half lengthwise and gluing the two outside (non-carved) faces together to make a cap that fits perfectly over the existing brace. This works because the over-carved center area of the brace had lowered the back frequency. The cap in effect creates sister beams on both sides of the carved-out area, restoring stiffness without adding a lot of mass.
I pre-profiled the lower bout back brace and carved a bit too much out of the center, giving a lower frequency than wanted. I split a matching section of brace in half and glued the outside faces together to form a perfect-fitting cap, then glued it over the weak section. I shaved almost all of the height off the cap with a small plane — the restoration of stiffness came almost entirely from the sister-beam effect on either side of the carved-out area.
The additional height raised the back frequency to around 255 Hz with very little coupling to the top, which itself moved toward 190 Hz. After a lot of careful planing I ended up with top between 188 and 190 Hz (depending how I hold the guitar while tapping) and back at 245 Hz. The guitar sounds good — I never really heard a problem with the original response, but it was satisfying to play with the physics. Note that the relative back response in the final curve is a little less prominent than the original.
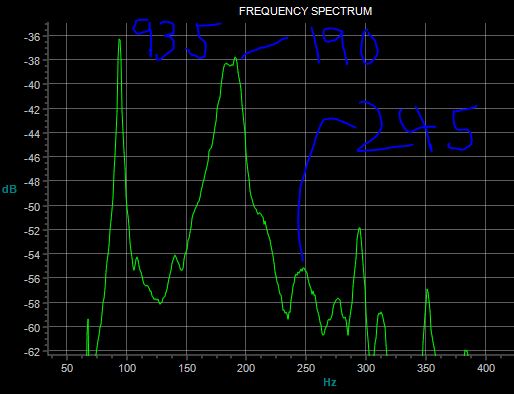
FRC after back tuning — top 188–190 Hz, back 245 Hz. Note reduced relative back response compared to original.
Panama Rosewood Contemporary Classical
TypeContemporary Classical — traditional look, modern construction
TopLutz Spruce (Carpathian Spruce selected at build)
Back & SidesPanama Rosewood — black fiber center strip
BracingFalcate — 4K 5.7oz CF-reinforced laminated Lutz Spruce, 32' radius
Brace HeightsMain falcate 10mm, secondary falcate 7.5mm
NeckGore-style bolt-on/bolt-off with 4mm mahogany wedge
FretboardRadiused — 24" radius
HeelVestigial — cleaner profile enabled by neck extension
BindingsEbony with maple purfling
Top PurflingsBlack / Rosewood / Black — three-strip
End GraftEbony and maple strip
RosetteAmboyna Burl ring with Russian tile purflings
Headstock VeneerBrazilian Rosewood with black/white fiber
BridgeCF-reinforced Walnut — ebonized with vinegar/steel wool
Pore FillerAqua Coat (water-based) — first use, preferred over Z-Poxy
FinishPost-catalyzed Royal Lac — HVLP 1.2mm, wet sanded and buffed
Top Resonance188–190 Hz (after back tuning)
Back Resonance245 Hz — raised via Trevor Gore split-cap brace method
.jpg)
.jpg)
.jpg)
.jpg)
.jpg)
.jpg)
.jpg)
.jpg)
.jpg)
.jpg)
.jpg)
.jpg)
.jpg)
.jpg)
.jpg)
.jpg)
.jpg)
.jpg)
.jpg)
.jpg)
.jpg)
.jpg)
.jpg)
.jpg)
.jpg)
.jpg)
.jpg)
.jpg)
.jpg)
.jpg)
.jpg)
.jpg)
.jpg)
.jpg)
.jpg)
.jpg)
.jpg)
.jpg)
.jpg)
.jpg)
.jpg)
.jpg)
.jpg)
.jpg)
.jpg)
.jpg)
.jpg)
.jpg)
.jpg)
.jpg)
.jpg)
.jpg)
.jpg)
.jpg)
.jpg)
.jpg)
.jpg)
.jpg)
.jpg)
.jpg)
.jpg)
.jpg)
.jpg)
.jpg)
.jpg)
.jpg)
.jpg)
.jpg)
.jpg)
.jpg)
.jpg)
.jpg)
.jpg)
.jpg)
.jpg)
.jpg)
.jpg)
.jpg)
.jpg)
.jpg)
.jpg)
.jpg)
.jpg)
.jpg)
.jpg)
.jpg)
.jpg)
.jpg)
.jpg)
.jpg)
.jpg)
.jpg)
.jpg)
.jpg)
.jpg)
.jpg)
.jpg)
.jpg)
.jpg)
.jpg)
.jpg)
.jpg)
.jpg)
.jpg)
.jpg)
.jpg)
.jpg)
.jpg)
.jpg)
.jpg)
.jpg)
.jpg)
.jpg)
.jpg)
.jpg)
.jpg)
.jpg)
.jpg)
.jpg)
.jpg)
.jpg)
.jpg)
.jpg)
.jpg)
.jpg)
.jpg)
.jpg)
.jpg)
.jpg)
.jpg)
.jpg)
.jpg)
.jpg)
.jpg)