This is a build blog of a Cocobolo and Western Red Cedar. It was originally posted as I worked on a variety of Luthiere forums.
Sept 9th 2017
I picked up the cocobolo awhile ago from another luthier. A great looking set I so I decided to use this set for a stock build.
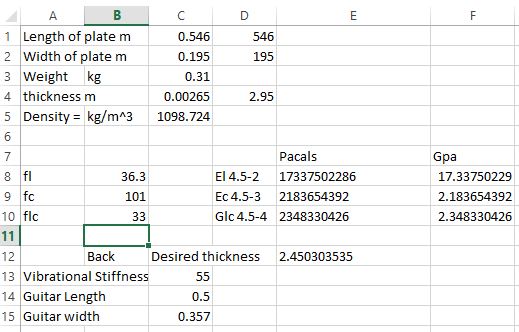
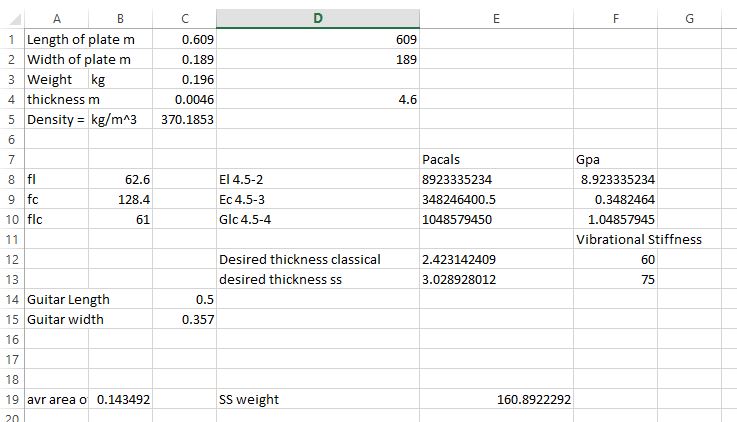
Cocobolo is a dense wood. Luckily it is also very stiff so I can sand this set down enough to build an active back.
I have had the Western Red Cedar for awhile. I liked how one of my smaller earlier WRC guitars sounded so I decided to hear how it worked with falcate bracing. At 3 mm it ends up about 20% thicker than my spruce tops but it is not as dense as most of the spruce I use so its stiffness to density ratio is OK.
I jointed both sets of plates using my rope jig. I use a low angle plane and a shooting board to joint the sets of plates
WIth the top and back joined I played around with a new layout for a 00. I moved the sound hole almost an inch closer to the neck (more like it would be found on a classical). With this change and using a 25.4 long scale, the fretboard will fall nearly in the center of the lower bout. You might be able to see the falcate bracing pattern and the new sound hole location penciled in on my old 12 fret SS 00 template.
With the sound hole location in place I constructed a rosette on the top. The rosette will be 5 thin purfling strips BWRosewoodWB on the inside and outside of a wooden ring. To get the purflings in tight and round I route the channels sized for the purfling stack and install the purflings first. I glued in both in one go and then leveled them to the top.
Size the depth of the routers cut. Just used something the right thickness.
Installation of one of the rings
gluing them in with Titebond hide glue. I use a transparent caul to be able to see if all of the purflings are in place.
With the purflings installed I just sneak up on them with the router
I use the size of the cut channel to make a proper sized wood ring. When routing I start outside of the ring and inside then up of the proper size. The Bishop Cockran router base allows for really fine adjustments to just do it one the fly.
I set the depth of the cut to the desired thickness of the ring. I then sand the back of the routed blank in my thickness sander to the ring drops out.
THe ring dropped right in and I glued in with the titebond hide glue.
THis guitar will be built with an active back with a 10' radius. The large bend will stiffen the back allowing a thinner back to have the desired stiffness. To get a good response out of the back it needs to have a relatively low mass. It also needs to be stiff enough to get a good ring tone out of the wood at the desired resonance frequency.
The side templates I have are for a guitar with a 15' radius back. To get the correct profile placed some poster board in my mold sitting in the radius dish and using a compass transferred the profile to make two templates.
With highly figured wood I wash the side with naptha and flip the boards looking for cracks. THis set did not have any. If I did find cracks I would flood them with thin CA.
I profiled both sides on my band saw and thicknessed them to .080". Cocobolo is OK to bend but the curves required for a Venetian cutaway are tight. So I pulled out a scraper and thinned the cutaway side from just beyond the waist to the heel end of the side to a bit more than .070".
I also sprayed the sides with SuperSoft 2, wraped them in parchment paper and let them sit overnight.
To give myself the best possible chance of bending the wood in a fox side bending machine, I warmed the cutaway are on the underside with a heat gun. No panic here I just did this while the blanket was heating up to temperature on the other side.
Successful bend!
I almost bent the non cutaway side for the wrong side. I always check a million times and luckily on that millionth time it dawned on me that it was the wrong way. THat side bent with no issues.
To make a heel I dug through my stash of mahogany to find a piece long enough and thick enough with the endgrain off to the sides. With it being a cutaway I need the block to be a finish sand distance more than 29 mm minus the thickness of the cutaway side. My fret board will be 58 mm at the join and I want the fretboard flush with side. The block needs to slope out a bit a touch more than the taper of the fret board so that the fretboard will stay on the top as it extends down to the sound hole.
A bunch of clamps to glue it in.
While waiting I stuck some sandpaper on the rims near the heel and profiled a plywood end block.
With the blocks glued on I draw some reference lines parallel to the still flat top (and perpendicular to the heel block). I have a set of blocks that I use as two sided parallel. I lay out the blocks flat on the table, the mold sits on the top and the rims are pushed flush with base. The mold is used as a guide for drawing the lines. I flip the blocks on end and repeat. Now I have two sets of lines I can use to get my guitar into the mold in the correct position any time I want to pull the rims from the mold. Also when radiusing the rims I have a set of reference lines I can use to assure that I am evenly sanding. I made one line that was two close the end.
I start by radiusing the top of a radius dish. This guitar will have a 32' radius. I am trying something new for me based on some direction's John Hall gave. Instead of radiusing the entire top rims I radiused them to just past the center of the waist. To achieve this I just placed a piece of paper under the heel block while I sanded.
I did a quick check of angle of the upper bout relative to lower bout. I will wait until I have the braced to to fine tune the angle. but it is close.
The back is both radiused and profiled to the correct dimensions. note the blue tape on the top blocks. I can not count the number of times I have started sanding profiled top rims on the backs radius board. Also I have the block sizes marked on the rims. In this case I reached the end block height first. So I put a slip of paper under the block and continued sanding the heel block to size.
Finishing the rims were all standard stuff. I am using AST A4 kerfing for the back (good for the 10' radius). I am using reverse kerfed lines for the top. To get get the kerfed linings to bend with out breaking. I spritz them with water and used the outside of the rims as a bending mold. I also heated the cutaway section to get it to bend.
From there I inlet a bunch of thin side strips into the linings and cleaned everything up.
Sept 14th 2017
Stopped again waiting for some epoxy to clear and getting ready for a weekend trip but I made some progress. The rims are complete, the back is braced and I am starting on the top.
To complete the rims I installed an end wedge using a scalpel, razor saw and chisel. I also have a black purfling line. My binding will have a white and black purfling line. My thought is if things go well I can miter in the black purfling line and let the white go across. If things do not go well both the white and black purfling on the binding will go across the end wedge. I never like my miters, with a single black line I can just butt join and nobody will see the difference.
The back is the active back bracing pattern that I got from the Trevor Gore steel string guitar plans
I laminated a bunch of 1.7 mm spruce strips to make the facate braces. I bend the strips close to shape on a bending pipe.
For those making a steel string falcate guitar this next step is ultra critical. Most steel string guitar builders work to get bridge plate positioned to be very close, but ultimately place the bridge when the guitar is complete based on the position of the nut. Because the falcate braces pass very close between the bridge pins the bridge is positioned at this time. As the build progresses everything is placed from the already placed bridge. Because of this I take care to carefully layout the top and the bridge location.
Installed a sound hole doubler patch.
While waiting for the glue I made a 1.5 mm panama rosewood bridge patch.
I used an LMI rosette tool and a router to cutout the sound hole. I was going to do it all with the hand tool but with the sound hole patch the the tools blade was not deep enough.
I am using epoxy to glue down a carbon fiber reinforced bridge plate
Note the wet area is not epoxy, I just cleaned up very minimal epoxy with some alcohol

.jpg) Cocobolo is a dense wood. Luckily it is also very stiff so I can sand this set down enough to build an active back.
Cocobolo is a dense wood. Luckily it is also very stiff so I can sand this set down enough to build an active back.
 I have had the Western Red Cedar for awhile. I liked how one of my smaller earlier WRC guitars sounded so I decided to hear how it worked with falcate bracing. At 3 mm it ends up about 20% thicker than my spruce tops but it is not as dense as most of the spruce I use so its stiffness to density ratio is OK.
.jpg)
 I jointed both sets of plates using my rope jig. I use a low angle plane and a shooting board to joint the sets of plates
.jpg)
.jpg) WIth the top and back joined I played around with a new layout for a 00. I moved the sound hole almost an inch closer to the neck (more like it would be found on a classical). With this change and using a 25.4 long scale, the fretboard will fall nearly in the center of the lower bout. You might be able to see the falcate bracing pattern and the new sound hole location penciled in on my old 12 fret SS 00 template.
WIth the top and back joined I played around with a new layout for a 00. I moved the sound hole almost an inch closer to the neck (more like it would be found on a classical). With this change and using a 25.4 long scale, the fretboard will fall nearly in the center of the lower bout. You might be able to see the falcate bracing pattern and the new sound hole location penciled in on my old 12 fret SS 00 template.
.jpg) With the sound hole location in place I constructed a rosette on the top. The rosette will be 5 thin purfling strips BWRosewoodWB on the inside and outside of a wooden ring. To get the purflings in tight and round I route the channels sized for the purfling stack and install the purflings first. I glued in both in one go and then leveled them to the top.
With the sound hole location in place I constructed a rosette on the top. The rosette will be 5 thin purfling strips BWRosewoodWB on the inside and outside of a wooden ring. To get the purflings in tight and round I route the channels sized for the purfling stack and install the purflings first. I glued in both in one go and then leveled them to the top.
.jpg) Installation of one of the rings
Installation of one of the rings
.jpg) gluing them in with Titebond hide glue. I use a transparent caul to be able to see if all of the purflings are in place.
gluing them in with Titebond hide glue. I use a transparent caul to be able to see if all of the purflings are in place.
.jpg) With the purflings installed I just sneak up on them with the router
With the purflings installed I just sneak up on them with the router
.jpg)
.jpg) I use the size of the cut channel to make a proper sized wood ring. When routing I start outside of the ring and inside then up of the proper size. The Bishop Cockran router base allows for really fine adjustments to just do it one the fly.
I use the size of the cut channel to make a proper sized wood ring. When routing I start outside of the ring and inside then up of the proper size. The Bishop Cockran router base allows for really fine adjustments to just do it one the fly.
.jpg)
.jpg) I set the depth of the cut to the desired thickness of the ring. I then sand the back of the routed blank in my thickness sander to the ring drops out.
I set the depth of the cut to the desired thickness of the ring. I then sand the back of the routed blank in my thickness sander to the ring drops out.
.jpg)
.jpg)
.jpg) THe ring dropped right in and I glued in with the titebond hide glue.
THe ring dropped right in and I glued in with the titebond hide glue.
.jpg) THis guitar will be built with an active back with a 10' radius. The large bend will stiffen the back allowing a thinner back to have the desired stiffness. To get a good response out of the back it needs to have a relatively low mass. It also needs to be stiff enough to get a good ring tone out of the wood at the desired resonance frequency.
The side templates I have are for a guitar with a 15' radius back. To get the correct profile placed some poster board in my mold sitting in the radius dish and using a compass transferred the profile to make two templates.
THis guitar will be built with an active back with a 10' radius. The large bend will stiffen the back allowing a thinner back to have the desired stiffness. To get a good response out of the back it needs to have a relatively low mass. It also needs to be stiff enough to get a good ring tone out of the wood at the desired resonance frequency.
The side templates I have are for a guitar with a 15' radius back. To get the correct profile placed some poster board in my mold sitting in the radius dish and using a compass transferred the profile to make two templates.
.jpg)
.jpg) With highly figured wood I wash the side with naptha and flip the boards looking for cracks. THis set did not have any. If I did find cracks I would flood them with thin CA.
With highly figured wood I wash the side with naptha and flip the boards looking for cracks. THis set did not have any. If I did find cracks I would flood them with thin CA.
.jpg) I profiled both sides on my band saw and thicknessed them to .080". Cocobolo is OK to bend but the curves required for a Venetian cutaway are tight. So I pulled out a scraper and thinned the cutaway side from just beyond the waist to the heel end of the side to a bit more than .070".
I profiled both sides on my band saw and thicknessed them to .080". Cocobolo is OK to bend but the curves required for a Venetian cutaway are tight. So I pulled out a scraper and thinned the cutaway side from just beyond the waist to the heel end of the side to a bit more than .070".
.jpg) I also sprayed the sides with SuperSoft 2, wraped them in parchment paper and let them sit overnight.
I also sprayed the sides with SuperSoft 2, wraped them in parchment paper and let them sit overnight.
.jpg) To give myself the best possible chance of bending the wood in a fox side bending machine, I warmed the cutaway are on the underside with a heat gun. No panic here I just did this while the blanket was heating up to temperature on the other side.
To give myself the best possible chance of bending the wood in a fox side bending machine, I warmed the cutaway are on the underside with a heat gun. No panic here I just did this while the blanket was heating up to temperature on the other side.
.jpg)
.jpg) Successful bend!
Successful bend!
.jpg)
.jpg) I almost bent the non cutaway side for the wrong side. I always check a million times and luckily on that millionth time it dawned on me that it was the wrong way. THat side bent with no issues.
I almost bent the non cutaway side for the wrong side. I always check a million times and luckily on that millionth time it dawned on me that it was the wrong way. THat side bent with no issues.
.jpg) To make a heel I dug through my stash of mahogany to find a piece long enough and thick enough with the endgrain off to the sides. With it being a cutaway I need the block to be a finish sand distance more than 29 mm minus the thickness of the cutaway side. My fret board will be 58 mm at the join and I want the fretboard flush with side. The block needs to slope out a bit a touch more than the taper of the fret board so that the fretboard will stay on the top as it extends down to the sound hole.
To make a heel I dug through my stash of mahogany to find a piece long enough and thick enough with the endgrain off to the sides. With it being a cutaway I need the block to be a finish sand distance more than 29 mm minus the thickness of the cutaway side. My fret board will be 58 mm at the join and I want the fretboard flush with side. The block needs to slope out a bit a touch more than the taper of the fret board so that the fretboard will stay on the top as it extends down to the sound hole.
.jpg) A bunch of clamps to glue it in.
A bunch of clamps to glue it in.
.jpg) While waiting I stuck some sandpaper on the rims near the heel and profiled a plywood end block.
While waiting I stuck some sandpaper on the rims near the heel and profiled a plywood end block.
.jpg) With the blocks glued on I draw some reference lines parallel to the still flat top (and perpendicular to the heel block). I have a set of blocks that I use as two sided parallel. I lay out the blocks flat on the table, the mold sits on the top and the rims are pushed flush with base. The mold is used as a guide for drawing the lines. I flip the blocks on end and repeat. Now I have two sets of lines I can use to get my guitar into the mold in the correct position any time I want to pull the rims from the mold. Also when radiusing the rims I have a set of reference lines I can use to assure that I am evenly sanding. I made one line that was two close the end.
With the blocks glued on I draw some reference lines parallel to the still flat top (and perpendicular to the heel block). I have a set of blocks that I use as two sided parallel. I lay out the blocks flat on the table, the mold sits on the top and the rims are pushed flush with base. The mold is used as a guide for drawing the lines. I flip the blocks on end and repeat. Now I have two sets of lines I can use to get my guitar into the mold in the correct position any time I want to pull the rims from the mold. Also when radiusing the rims I have a set of reference lines I can use to assure that I am evenly sanding. I made one line that was two close the end.
.jpg)
.jpg)
.jpg) I start by radiusing the top of a radius dish. This guitar will have a 32' radius. I am trying something new for me based on some direction's John Hall gave. Instead of radiusing the entire top rims I radiused them to just past the center of the waist. To achieve this I just placed a piece of paper under the heel block while I sanded.
I start by radiusing the top of a radius dish. This guitar will have a 32' radius. I am trying something new for me based on some direction's John Hall gave. Instead of radiusing the entire top rims I radiused them to just past the center of the waist. To achieve this I just placed a piece of paper under the heel block while I sanded.
.jpg) I did a quick check of angle of the upper bout relative to lower bout. I will wait until I have the braced to to fine tune the angle. but it is close.
I did a quick check of angle of the upper bout relative to lower bout. I will wait until I have the braced to to fine tune the angle. but it is close.
.jpg) The back is both radiused and profiled to the correct dimensions. note the blue tape on the top blocks. I can not count the number of times I have started sanding profiled top rims on the backs radius board. Also I have the block sizes marked on the rims. In this case I reached the end block height first. So I put a slip of paper under the block and continued sanding the heel block to size.
The back is both radiused and profiled to the correct dimensions. note the blue tape on the top blocks. I can not count the number of times I have started sanding profiled top rims on the backs radius board. Also I have the block sizes marked on the rims. In this case I reached the end block height first. So I put a slip of paper under the block and continued sanding the heel block to size.
.jpg) Finishing the rims were all standard stuff. I am using AST A4 kerfing for the back (good for the 10' radius). I am using reverse kerfed lines for the top. To get get the kerfed linings to bend with out breaking. I spritz them with water and used the outside of the rims as a bending mold. I also heated the cutaway section to get it to bend.
Finishing the rims were all standard stuff. I am using AST A4 kerfing for the back (good for the 10' radius). I am using reverse kerfed lines for the top. To get get the kerfed linings to bend with out breaking. I spritz them with water and used the outside of the rims as a bending mold. I also heated the cutaway section to get it to bend.
.jpg) From there I inlet a bunch of thin side strips into the linings and cleaned everything up.
From there I inlet a bunch of thin side strips into the linings and cleaned everything up.
.jpg)
.jpg)
.jpg)
.jpg)
.jpg)
.jpg) The back is the active back bracing pattern that I got from the Trevor Gore steel string guitar plans
The back is the active back bracing pattern that I got from the Trevor Gore steel string guitar plans
.jpg)
.jpg)
.jpg)
.jpg)
.jpg)
.jpg)
.jpg) I laminated a bunch of 1.7 mm spruce strips to make the facate braces. I bend the strips close to shape on a bending pipe.
I laminated a bunch of 1.7 mm spruce strips to make the facate braces. I bend the strips close to shape on a bending pipe.
.jpg)
.jpg) For those making a steel string falcate guitar this next step is ultra critical. Most steel string guitar builders work to get bridge plate positioned to be very close, but ultimately place the bridge when the guitar is complete based on the position of the nut. Because the falcate braces pass very close between the bridge pins the bridge is positioned at this time. As the build progresses everything is placed from the already placed bridge. Because of this I take care to carefully layout the top and the bridge location.
For those making a steel string falcate guitar this next step is ultra critical. Most steel string guitar builders work to get bridge plate positioned to be very close, but ultimately place the bridge when the guitar is complete based on the position of the nut. Because the falcate braces pass very close between the bridge pins the bridge is positioned at this time. As the build progresses everything is placed from the already placed bridge. Because of this I take care to carefully layout the top and the bridge location.
.jpg)
.jpg)
.jpg) Installed a sound hole doubler patch.
Installed a sound hole doubler patch.
.jpg) While waiting for the glue I made a 1.5 mm panama rosewood bridge patch.
While waiting for the glue I made a 1.5 mm panama rosewood bridge patch.
.jpg)
.jpg)
.jpg)
.jpg) I used an LMI rosette tool and a router to cutout the sound hole. I was going to do it all with the hand tool but with the sound hole patch the the tools blade was not deep enough.
I used an LMI rosette tool and a router to cutout the sound hole. I was going to do it all with the hand tool but with the sound hole patch the the tools blade was not deep enough.
.jpg) I am using epoxy to glue down a carbon fiber reinforced bridge plate
I am using epoxy to glue down a carbon fiber reinforced bridge plate
.jpg)
.jpg) Note the wet area is not epoxy, I just cleaned up very minimal epoxy with some alcohol
Note the wet area is not epoxy, I just cleaned up very minimal epoxy with some alcohol
.jpg) Not shown I have a bunch of clamps.
Not shown I have a bunch of clamps.