Second Falcate Classical Guitar Build Blog:
November 9th 2015
I finished applying shellac last week. To position the bridge I bolted on the neck. A perfect time for some encouraging photos. I still have yet to level sand or polish the royal-lac back and sides or the French Polished top. It looks good in the pictures, but it definitely has a hand applied finish look.
.jpg)
.jpg)
.jpg)
I set the fret board nut location to have a nut compensation as well as saddle compensation. I really spent a lot of time calculating and triple checking the location of the saddle. I did all of the measurements from the first slot as the fret board is about 3 mm short of the zero slot location. After it was taped in place I also checked the location against my other falcate classical (I could have thought about this first) and I had located it exactly in the same location.
.jpg)
I drilled a couple of 1/16" holes in the saddle slot and used the drill bits as location pins.
.jpg)
With the bridge in place using a new scalpel blade I carefully scored the finish and used a utility blade (actually three by the time I finished) to scrape the shellac under the bride.
.jpg)
.jpg)
.jpg)
I glued the bridge in place. Added a couple of shims to the wings to help push them down and fired up my vacuum clamp to clamp the bridge. After about 6 minutes I stop the clamping and removed the still soft squeeze-out. It has been clamping for about an hour now so I can head back down.
.jpg)
.jpg)
.jpg)
November 9th 2015
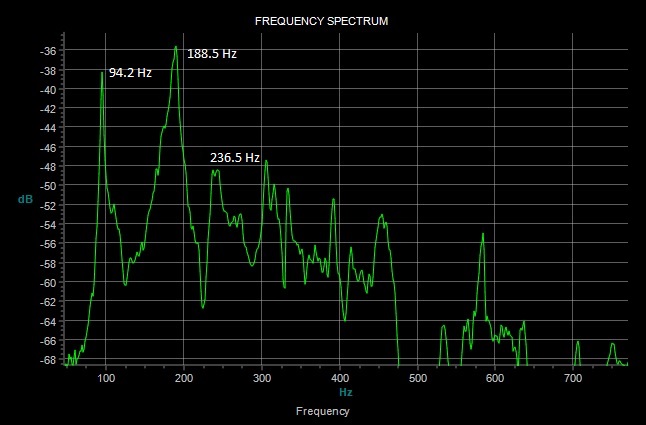
I made the compensated nut and saddle and strung the guitar up. The sounded sounded great about a half an hour after I put the first set of strings on. I am really excited to hear how it sounds over the next week. My target for the top was 190 Hz, almost got it. I ended up at 94.2 Hz for the T (1,1)1 188.4 for T (1,1)2 and 236.5 for the T(1,1)3. Graph below. I still need to clean up the nut and saddle buff out the finish, do a final set up in a couple of days. Also I will add a small dot on the side of the fret board at the 7 fret.
.jpg)
I sort of cheated on the compensation as I used the same scale length and the same strings that are in the classical guitar example in the book. I did not have to run the calculations. I made the compensated nut and then measured the active string length for each string and marked the saddle. I make the compensated nut a little differently than Trevor's method in the Book. I used my saddle slotting jig and my Bishop Cochran router base as a little milling machine. One turn of the set screw for the fence is equal to .8 mm. It is really easy to see it hit 1/8ths of a turn so I can cut with an accuracy to .1 mm or so. I leave a little extra compensation on the nut and fine tune once I have the nut mounted. I use a sharp chisel to nail the compensation numbers.
.jpg)
.jpg)
.jpg)
.jpg)
.jpg)
The Book has a table and tells how to make a table to calculate nut and saddle compensation based on scale length, strings and action. As I mentioned, I was able to use the example in the book. The table includes the active string length for each string. I used that measurement from the nut to mark out the saddle compensation.
.jpg)
Start
| 