Kenneth Michael Guitars est.1978
“ Pro's Preferred Series© Professional style” guitar mold KITS
Many of the Guitar Construction publications now available describe a methodology
that requires the use of a precision outside mold. Unfortunately, construction of such a
fixture requires a large band saw and or the use of a large router and templates. The
Pro's Preferred Series© mold kits fills a void by providing an option to purchasing an
expensive ready to use mold or the necessity of upgrading ones shop with costly
equipment. The concept for these professional style molds is based on CNC
technology. By using computer controlled routers the mold sides can be accurately cut
to shape, in addition precision location holes are drilled that allow the sides to be
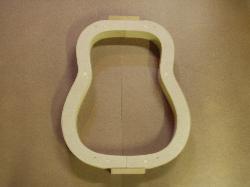
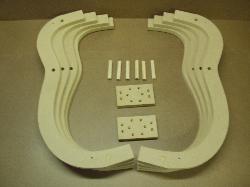
stacked and pinned in exact relationship to each other. The mold is made of THREE or
FOUR layers of MDF totalling 3" OR 2 1/4". The sides are cut the preferred in and out
contour design to allow the use of clamps on the sides of the mold. The two mold
halves are fastened with spanners so that the guitar end blocks can be clamped and
glued with out obstruction while the sides are in the mold. The "D", Jumbo and 00014
profiles have been CMM quality checked and are the exact Martin profiles. The 00012
is based off the popular blue print sold by many suppliers. The quality materials and a
few minutes of assembly will yield a fixture that will last for many years.
Photos are file copies current mold
design uses 1/4" dowels -- assembly is
essentially the same. Note the profile
sections can be held together with
mechanical fasteners instead of glue.
design uses 1/4" dowels -- assembly is
essentially the same. Note the profile
sections can be held together with
mechanical fasteners instead of glue.
Apply a liberal amount of Tite-Bond
glue to the first layer. Try to keep the
glue from the edges – it will spread
itself when clamped. By doing it this
way there will be less squeeze out to
clean after clamping.
glue to the first layer. Try to keep the
glue from the edges – it will spread
itself when clamped. By doing it this
way there will be less squeeze out to
clean after clamping.
Glue need only be applied to one side of each layer, stack the layers. Drip a small
amount of glue into the pinholes; line up the layers than insert the pins. Seat the
pins all the way with a mallet. Clean up the glue pushed through by the pins.
Clamp the side assembly to a sturdy table/bench as illustrated in the picture. This
clamping method assures that the assembly will be flat when the adhesive dries
Allow the side assemblies to dry. Next, the sides are fastened together using the
spanners and ten screws at each end. Clamp the sides at the waist making certain
that they are in perfect alignment. Clamp the spanner in place at the centerline.
Pre-drill all ten holes. Check alignment as the spanner is secured with the screws.
Repeat above procedure for the other end
spanners and ten screws at each end. Clamp the sides at the waist making certain
that they are in perfect alignment. Clamp the spanner in place at the centerline.
Pre-drill all ten holes. Check alignment as the spanner is secured with the screws.
Repeat above procedure for the other end
Glue drips should be sanded off and the
edges slightly relieved. Sand the inside of
the mold smooth – this will allow the sides of
the guitar to be removed more easily.
edges slightly relieved. Sand the inside of
the mold smooth – this will allow the sides of
the guitar to be removed more easily.


