I did a bunch of prep work and cut ramps in the head stock slots. I made squared off ones for the first time. A little scary I just cut the edges with a razor saw and carved out the waste with a chisel. There is a bit of back and forth to get the line between the veneer and mahogany to look symmetrical.
March 10th 2015
I am waiting a few more days until the finish cures of the guitar so that I can buff it out. While waiting I decided to build a contemporary bridge mostly following the instructions from Gore\Gilet build volume. This is a CF, 2 layers, reinforced Padauk. I used padauk as it is lighter than rosewood by a little bit. A lot lighter than cocobolo. It is a little heavier than black walnut, but at least as the time I wanted the color.
Before making the bridge I made a router jig to route the separation between the saddle block and the tie block. Also I used it to route a saddle. The jig is simple I routed a channel for two pieces of aluminium that were just right two hold the router base guide stable. With the tracks in place I used the router in the guides to route a well for to hold the bridge while I am working on it. The leading edge of the well is perfectly in line with the router track because I routed it using the track.
I sliced a strip of padauk close to the bridge size and resawed it so that I could make a 2 mm, 3 mm and a 4 mm slices to be laminated with the carbon fiber strips.
I used some west system epoxy 105\206, laminated the stack together, clamped it and let it cure overnight
The next step was drilling the string holes. I tried to make I nice reusable jig out of wood and aluminium, but drilled one hole off center. So I just drilled the holes in the bridge on my drill press. I took a bunch of extra time to make sure that everything was square to the drill bit.
I used my jig to make the first cut to separate the tie block and the saddle block. This cut went to 2mm from the bottom of the bridge. I then shaped the saddle with my luthiers friend remounted the bridge in my jig and cut the saddle and cut ledges for some bone strips on the tie block. I shaped the saddle block a bit with chisels and sand paper.
The bridge ended up at 16.5 grams (minus the bone that is coming)
I am still nervous about the color, as it is different for a bridge. But with a hint of brown in shellac it is not horribly off of the cocobolo head plate.
March 12th 2015
Yikes, when I installed the tuners in the middle of the head stock on one side the tuner was up above the veneer about a half of mm. I remember how proud I was of my ability to sharpen a scrapper while thicknessing the veneer to the final thickness. It appears on one side I scooped out a bit much. I thought for a bit of leaving it, but finally I got the nerve and lay my iron on to the top of the the head stock. cleanly pealed off the veneer and glued and shaped a new one. This time I put black fiber between the head stock and the veneer.
March 14th 2015
This is not the jig that Trevor Gore uses to machine his compensated nuts. He has a much more elegant jig that allows him to adjust the compensation he needs for each string attach a sized nut blank to the jig and machine the nut using a drill press as a pin router. I could not get together everything I needed to make the jig so until I do I found another method using my new made classical bridge jig that I based off of one in the book It seems to work.
When I made the classical bridge jig I used the rails to make the well so the front edge is parallel to the rails. My bishop Cochran router base adjustment is .8 mm per turn. So 1/2 = .4 mm, 1/4 = .2 and 1/8 = .1. These are all positions that are easy to see. I could probably get close to .05.
I made a nut holder that was the same thickness as the fret board so that I could easily set the depth. I zeroed on the front of the nut and proceeded to cut each slot. I had one that string location that I needed to ease the router into the rails. But it came out ok and pretty accurate. I have them all a tad more compensated so that I can clean the leading edge.
It still needs shaping but the front ledges are very close to where they should be. I will do a bit of clean up and make them just tight.
I glued the bone into the bridge so it was time to glue the bridge down.
I level sanded and polished the guitar so that I could do that without the bridge in the way. I used my ROS at 600 grit light sanding and then micro mesh disks up to 8000, followed by buffing.
Because I am doing all of this fancy compensation, I check and double checked the bridge placement. I used the 12 fret as my home to measure from as the nut edge of the fret board was cut 2 mm shorter. Because I have a compensated nut I need only .8 mm of compensation. I do have a wide saddle for a classical so I can compensated up to 3 mm.
I checked the plans to find a good location for the locating pins and drilled them
I use a scalpel with a brand new blade to outline the bridge. It is so sharp that a light cut cleanly cuts through the finish.
I use a heavy duty utility blade to scrape the finish off the wood. I tape the back end so I only need to keep track of one end.
To get ready for the vacuum clamp I taped some appropriate sized blocks on the wings, I just find it does a better job of clamping the wings, I leave the pins end but I duck taped the slot to get rid of leaks. I applied the vacuum clamp for about 8 minutes, cleaned up the squeeze out and am keeping it clamped for an hour or two.
March 14th 2015
and the tap test ...
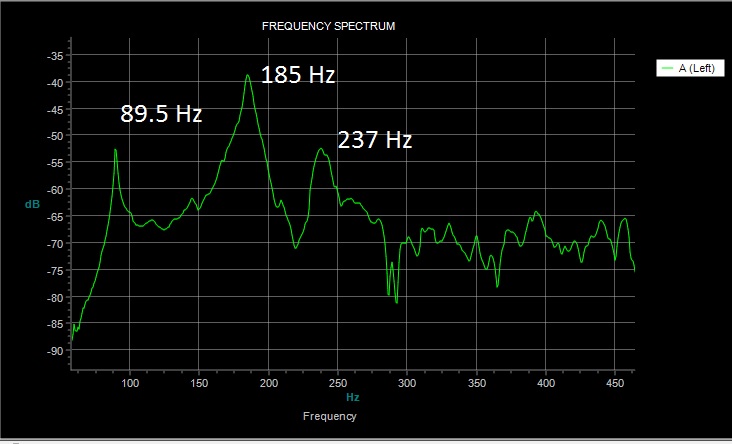
With the bridge glued on I did a tap test of this falcate classical. I think it came out with working values. Depending what happens with the strings, I can add mass to the sides if I want to lower the top off F# (I know it is right on F# as I have my falcate SS guitar on the wall with the g string tuned down to F# and it started singing. I left the bottom brace pretty tall so I can get the back on target as well. I will wait for the strings first. From a closed box tap test the top came down two hertz with the bridge and air up about 2 Hz. My fret board covers a bit of the sound hole so that might be what changed the air resonance.
March 22nd 2015
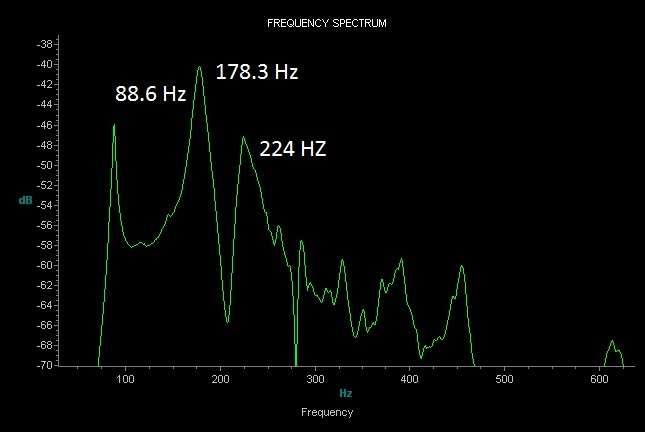
I completed my first falcate classical. All and all the project came out OK and the guitar sounds good, but I did miss my target frequency on the top. As seen in the figure below I was low around 178 Hz instead of 190 Hz for the top. This lower frequency puts the top and the Air resonance an octave apart 88.6 Hz. I am not really hearing any horrible weakness around F but I am also not hearing what the guitar could have sounded like. I did put the back about 4 semitones away at 224 Hz. Ultimately I should have had the falcate braces taller. Possible the 7 mm that I used for my SS.
As part of a postmortem on the project I looked back at my design assumptions. I noted that my falcate SS top was 172 Hz not the 180 I used in the assumptions for my relative analysts. If I was a bit more careful early on and knowing that I wanted to push the target top resonance 20 Hz higher than my SS I may have left the braces taller.
Over all I am still happy with what I have and I have good data for my next attempt and a good guitar.

.jpg)
.jpg)
.jpg)
.jpg)
.jpg)
.jpg) I sliced a strip of padauk close to the bridge size and resawed it so that I could make a 2 mm, 3 mm and a 4 mm slices to be laminated with the carbon fiber strips.
I sliced a strip of padauk close to the bridge size and resawed it so that I could make a 2 mm, 3 mm and a 4 mm slices to be laminated with the carbon fiber strips.
.jpg)
.jpg)
.jpg)
.jpg)
.jpg)
.jpg)
.jpg)
.jpg)
.jpg)
.jpg)
.jpg)
.jpg)
.jpg)
.jpg)
.jpg)
.jpg)
.jpg)
.jpg)
.jpg)
.jpg)
.jpg)
.jpg)
.jpg)
.jpg)
.jpg)
.jpg)
.jpg)
.jpg)
.jpg)
.jpg)
.jpg)
.jpg)
.jpg)
.jpg)
.jpg)
.jpg)
.jpg)
.jpg)
.jpg)
.jpg)
.jpg)
.jpg)
.jpg)