Kenneth Michael Guitars LLC
| KMG "Success Kit" ™ Understanding how to route Binding Channels workspace, setup, execution |
Cutting the binding and/or purfling channels in a guitar need not be intimidating. If we
have the proper tools, an understanding of the goal, and a well laid out work area; there
is no reason not to expect complete “Success”.
have the proper tools, an understanding of the goal, and a well laid out work area; there
is no reason not to expect complete “Success”.
The workspace must be open and unrestricted. The router power cord should be plugged
in from above. Continually moving or trying to avoid the power connection will surely
distract us form the intricate job at hand. Also, bright light is a must, note that in addition
to our overhead fluorescent lamps there is a daylight fixture mounted to the workbench.
in from above. Continually moving or trying to avoid the power connection will surely
distract us form the intricate job at hand. Also, bright light is a must, note that in addition
to our overhead fluorescent lamps there is a daylight fixture mounted to the workbench.

Several rubber bands tied together make an effective stress spring. The spring is secured
to the rafters with the power cord tied in a knot
to the rafters with the power cord tied in a knot

I have found that the most important concept to remember when hand routing binding
channels is the requirement to FOCUS on the router bit. That is where the action is!! The
contact of the bit to the work must be in plane view at all times --- otherwise how can we
hope to control the process? To aide in this goal I do the routing sitting on chair equipped
with rollers. This strategy makes it easy to move around, keep the bird’s eye view while
having complete control of the router and base. Naturally a dust mask and safety glasses
are mandatory!

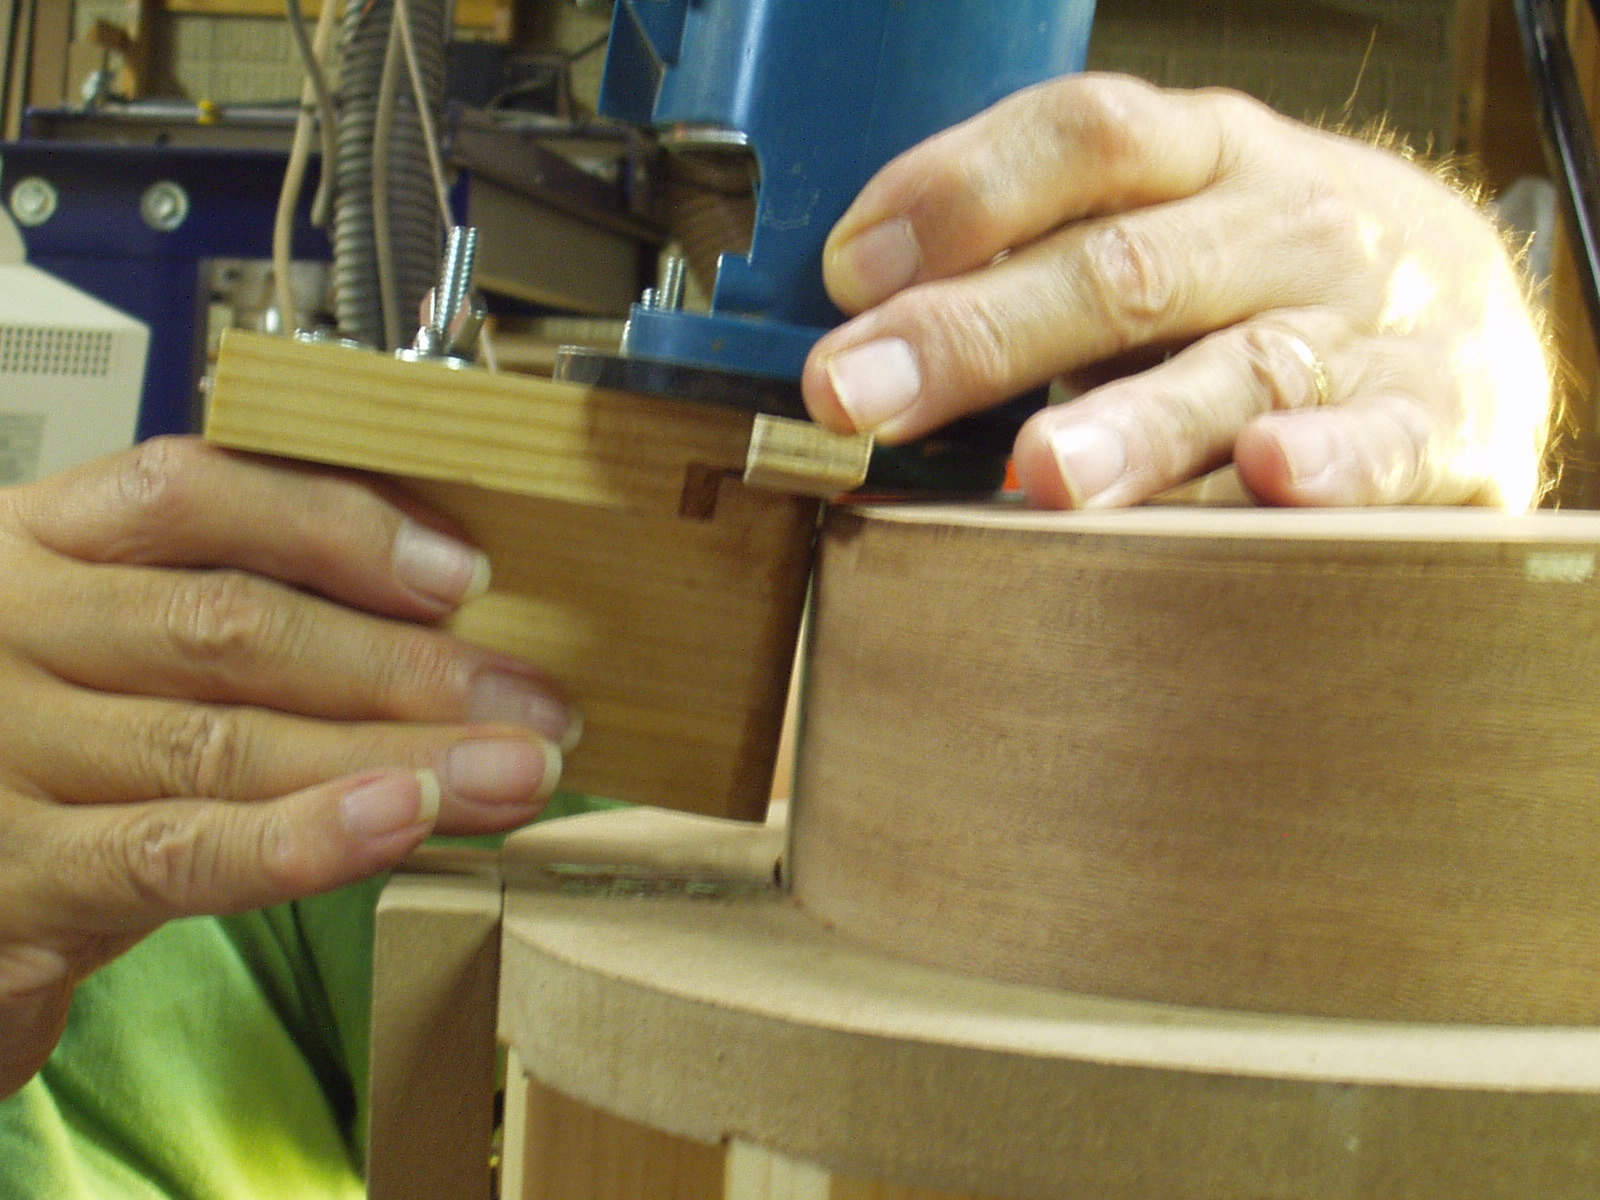
The KMG “IA Binding attachment” is easily adjustable to cut binding rebates of virtually
any size. To set the depth and width of the cut, short pieces of the actual binding/purfling
material is used as a gage. For the purfling, a stack of the strips, herringbone etc. is glue
up in one piece so the assembly will mirror the overall size.
any size. To set the depth and width of the cut, short pieces of the actual binding/purfling
material is used as a gage. For the purfling, a stack of the strips, herringbone etc. is glue
up in one piece so the assembly will mirror the overall size.

To set the depth of the cut simply tape a section of the binding etc. to the end of the
sliding guide, rotate the bit so the outter most edge lines up with the edge of the binding
material.
sliding guide, rotate the bit so the outter most edge lines up with the edge of the binding
material.

The height of the cut is set by laying the binding sample on the base, use the router's
height adjuster to bring the bit even with the binding. MAKE SURE ALL THE ADJUSTERS
(GUIDE AND ROUTER BASE) ARE PROPERLY TIGHTENED.
height adjuster to bring the bit even with the binding. MAKE SURE ALL THE ADJUSTERS
(GUIDE AND ROUTER BASE) ARE PROPERLY TIGHTENED.

| PRACTICE!! PRACTICE!! PRACTICE!! |
When you have the proper tool, like the “IA Binding Attachment” cutting rebates is not all
that difficult. However, realistically this process for many requires a completely new hand
eye coordination skill set. So like all other new motor skills it should be rehearsed. When it
is time to actually cut the channels on the prized instrument, the operator MUST be
comfortable in the knowledge that he understands what the router is about to do and that
he can control the tool. This is not a simplistic approach ---- anything less is a “hope and
a prayer” not craftsmanship.
Practice cuts can be made using scrap material. Shape does not matter. Make cuts with
the grain, against the grain, on the edges, on the flat sides. Clamp the practices piece to
the bench or use a vise if you have one. Work to get the feel of starting the cut. Stopping
in the middle of a cut. Taking the tool off the work piece. Get comfortable holding and
controlling the router using the guide handle and out rigger base.
Rule #1 DO NOT HOLD THE TOOL AROUND THE MOTOR --- the
goal is to guide the "cutting bit" not the motor.
goal is to guide the "cutting bit" not the motor.


When the tool is held at the guide
handle and the “out rigger” base, the
bit is pushed at the proper angle
parallel to the rim. As described above,
the back/top cannot be used as the
major guide surface. The consistent
vertical orientation of the rim provides
the logical guide surface.
handle and the “out rigger” base, the
bit is pushed at the proper angle
parallel to the rim. As described above,
the back/top cannot be used as the
major guide surface. The consistent
vertical orientation of the rim provides
the logical guide surface.

As the tool is moved around the body, the guide is held perpendicular to the rim. This
assures that the depth of the cut will be consistent all along the entire channel
assures that the depth of the cut will be consistent all along the entire channel


The spring loaded flexible foot on the “IA Binding Attachment” is designed to force the
cutting bit “off” the guitar body. The goal of this feature is to help prevent cutting
oversize channels that will result if the bit is allowed to tip inboard. The spring force of
the foot can be adjusted to suit the feel of each individual operator. We even change
the tension at different points in the channel cut.

Often over looked is the need to have
the work piece stabilized during the
routing operation. Trying to process a
moving target will almost certainly
produce unsatisfactory results. The
Master Work Mold provided in the
KMG “Success Kit” is designed to be
the perfect work holding device.
the work piece stabilized during the
routing operation. Trying to process a
moving target will almost certainly
produce unsatisfactory results. The
Master Work Mold provided in the
KMG “Success Kit” is designed to be
the perfect work holding device.
NOTE THAT ROUTING THE CHANNELS FOR THE TOP AND BACK ARE NOT ALL
DONE AT THE SAME TIME IN THE CONSTRUCTION SEQUENCE. THE BACK IS
ROUTED FIRST AND THIS IS BEFORE THE NECK MORTISE SLOT IS CUT
THROUGH THE SIDES INTO THE NECK BLOCK. WE NEED TO MAINTAIN THE
GUIDE SURFACE THE FULL WIDTH OF THE RIM. THE TOP CHANNELS ARE NOT
ROUTED UNTIL THE NECK SET ANGLE HAS BEEN DOUBLE CHECKED AND FINE
TUNED IF NECESSARY.
Once you are satisfied with your new routing skills using scrap material, its time to make
a few practice cuts using the guitar body. Simply set the bit very shallow, the practice
runs should produce smooth consistent channels much smaller than those actually
required. After a pass or two at the shallow settings you should be ready for the actual
cut.
a few practice cuts using the guitar body. Simply set the bit very shallow, the practice
runs should produce smooth consistent channels much smaller than those actually
required. After a pass or two at the shallow settings you should be ready for the actual
cut.
X
X
The quarter sawn materials found on better instruments have more predictable
expansion and contraction characteristics, this in turn helps to enhance the overall
day to day stability of the guitar. For the builder however, the thin quarter sawn top
and back material presents an area of concern when it is time to flush cut the
overhangs as well as when cutting the purfling and binding channels.
If you have ever split a log or seen that done, it is easy to understand that the goal is
to have the wedge start a tear in the wood along a grain line. Once a split is started
the log will separate the entire length. By comparison the top and back plates have
almost continuously exposed, full-length grain lines around the entire perimeter. So
there is a danger of the router bit cutting edge catching one of these well-defined
vertical grain lines and instantly starting a tear or split just like the log wedge. Since
the top/back is glued to the kerfing, long splits are not likely, but unfortunately a
sizable chunk of material can still chip out.
Use of a spiral or shear angle router bit is helpful but does not eliminate the problem.
Fortunately, being aware of the issue allows the builder to plan the routing path in a
pattern that helps to minimize the possibility of the bit cutting edge grabbing and
tearing the exposed vertical grain.

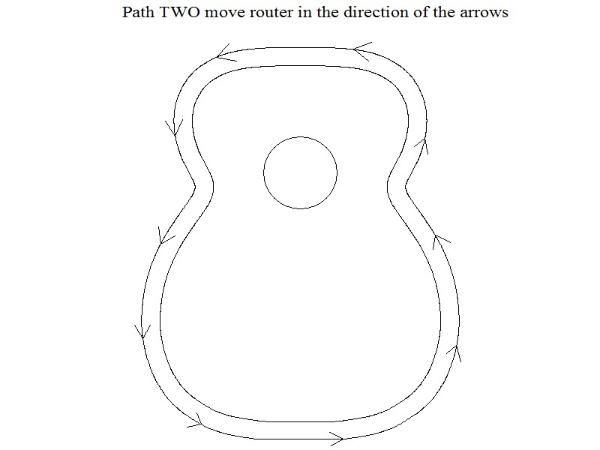
The four sections indicated should be routed to finish depth using multiple passes.
Take care to stay within the confines of the apex peaks. Once these areas are
channelled move on to phase two. The router can now be move around the perimeter
in the direction of the arrows in a continuous path. Having cleared the high risk
sections will minimize chip outs.
Take care to stay within the confines of the apex peaks. Once these areas are
channelled move on to phase two. The router can now be move around the perimeter
in the direction of the arrows in a continuous path. Having cleared the high risk
sections will minimize chip outs.
The above pattern applies to the flush trimming process as well as the binding/purfling
channel operations.
channel operations.